

The UMORF 3D Interface
Several options for making 3D models available online were considered for this site, but none were quite ideal. Our aim was to offer a system that would be useful to researchers but also suitable for use in K-12 classrooms and by anyone with an interest in fossils. With increasing browser support for 3D content, and the availability of software libraries such as three.js, developing the interface in-house became a possibility. This gave us greater control over important features and allowed us to shape the user experience to meet our goals.
The UMORF Viewer is a JavaScript application developed by Museum Collection Manager Adam Rountrey. It uses the three.js (www.threejs.org) library and WebGL (www.khronos.org/webgl) to display 3D models in a standard browser without plug-ins. However, it requires a browser that supports WebGL. Recent versions of Google Chrome, Mozilla Firefox, and Microsoft Internet Explorer for Windows support WebGL, as do Google Chrome and Mozilla Firefox on OS X. WebGL is also supported in Google Chrome on Android devices. You can test your browser at get.webgl.org.
Using the UMORF Viewer
 Instructions for using the Viewer appear in a pop-up box at the start of a viewing session, except when the site is accessed from a mobile device. For devices with a mouse or touchpad, holding down the left mouse button and moving the mouse will rotate about the center of the object. The center of rotation can be changed by hovering over part of an object and pressing the spacebar. To zoom, use the mouse wheel. Holding down the right mouse button and moving the mouse will pan. The current view can be returned to its default by selecting “Reset View”.
For touch devices, one-finger scroll will rotate, pinch will zoom, and three-finger scroll will pan.
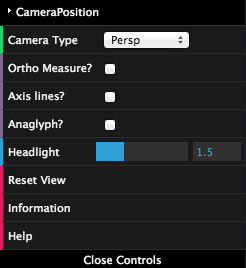 A drop-down, retractable, “Controls” panel is available in the upper right. Options under “Camera Position” allow you to change the camera position. “Camera Type” lets you choose between perspective or orthographic views. Perspective is a realistic view comparable to that of an observer or a physical camera placed at close- or medium-range. In perspective view, the foreground is slightly enlarged and the background correspondingly reduced in apparent scale, and effects such as parallax (differential displacement of features in foreground and background with change in viewer position) will be noted. Orthographic views (“OrthoLeft”, from a position on the animal’s left side; “OrthoDors”, from a position dorsal to [above] the animal; “OrthoAnt”, from a position anterior to [in front of] the animal) remove perspective and parallax effects by projecting all points on the object to a plane perpendicular to the line of sight (equivalent to viewing the object from infinitely far away … with a very powerful telescope!).
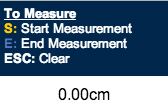 Measurements between points on an object can be made by placing measurement markers. Hover over the desired starting location and press “S”. A yellow sphere will appear, marking this point. Move to the desired ending location and press “E”. A blue sphere will appear, and the distance between the two points is displayed in the upper left of the window. Starting and ending points can be adjusted by pressing “S” or “E” again. To clear the measurement, press “ESC”. Measurements are not available on mobile devices.
An additional measurement mode is available in orthographic views. By selecting an orthographic view (e.g., OrthoLeft) and checking the box next to “Ortho Measure?” the user may place measurement markers on an invisible plane perpendicular to the current view rather than on the object itself.
Checking the box next to “Axis lines?” will cause three colored line segments to appear at the center of the view. The green line indicates anterior or front, the red line indicates right, and the blue line indicates dorsal or up.
Checking the box next to “Anaglyph?” activates a stereoscopic 3D effect that requires red/cyan glasses.
The intensity of light emitted from the camera can be changed by adjusting the “Headlight” bar. This may be useful for specimens with dark textures.
The information button displays a pop-up with information about the specimen.
The help button displays a pop-up with a navigation guide.
Using the UMORF BonePicker
The UMORF BonePicker is a version of the interface that presents a full skeleton of a mastodon. Bones that were not recovered for a particular individual are shaded. Hovering over a bone will cause its name to appear next to the cursor, and double-clicking a bone will open a new window or tab with a detailed view of that bone. Multiple detailed views can be open simultaneously, facilitating comparisons between models.
Measurements and navigation controls in the BonePicker are identical to those in the standard viewer.
The BonePicker is not supported on mobile devices.
Updates of the UMORF Viewer
We are already planning changes that will add functionality to the UMORF Viewer. The list below gives a list of features currently planned. If you have suggestions for additional features, or if you notice bugs in the Viewer please email: [email protected].
1. Allow user input for the x-, y-, and z-values under “Camera Position” – facilitating movement between anatomically defined views.
2. Upgrade measurement function by letting users place numbered markers at selected, anatomically defined locations (“landmarks”) on models and then have the viewer report the x-, y-, and z-coordinates of each of those points. This capability is important for many current approaches to comparing complex shapes.
3. Allow designation of regions on individual models to be “hot”, so that mousing over them brings up a label or other content.